
ARCHIVES: This is an older 2013 FAQ
See the Motion Blur Reduction FAQ for newer information. LightBoost is the classic way of using a strobe backlight to eliminate motion blur in gaming monitors.
This is the Frequently Asked Questions about LightBoost 2D motion blur elimination.
CRT-quality perfectly sharp motion on 120Hz LCD with no motion blur during gaming!
For instructions for ASUS/BENQ 120Hz, see LightBoost HOWTO.
For instructions with ULMB/GSYNC, see Motion Blur Reduction FAQ.
For a supported monitor list, see Official List of Gaming Monitors.
FAQ Index: General | Picture | Fluidity | Vision | Technical | Advanced Picture
General
Q: Easiest way to enable LightBoost?
For instructions, see the LightBoost HOWTO.
The new ToastyX StrobeLight method is the easiest LightBoost tweak.
Easy to turn ON/OFF LightBoost via a key press. No registry edits!Q: How do I change the LightBoost percentage setting?
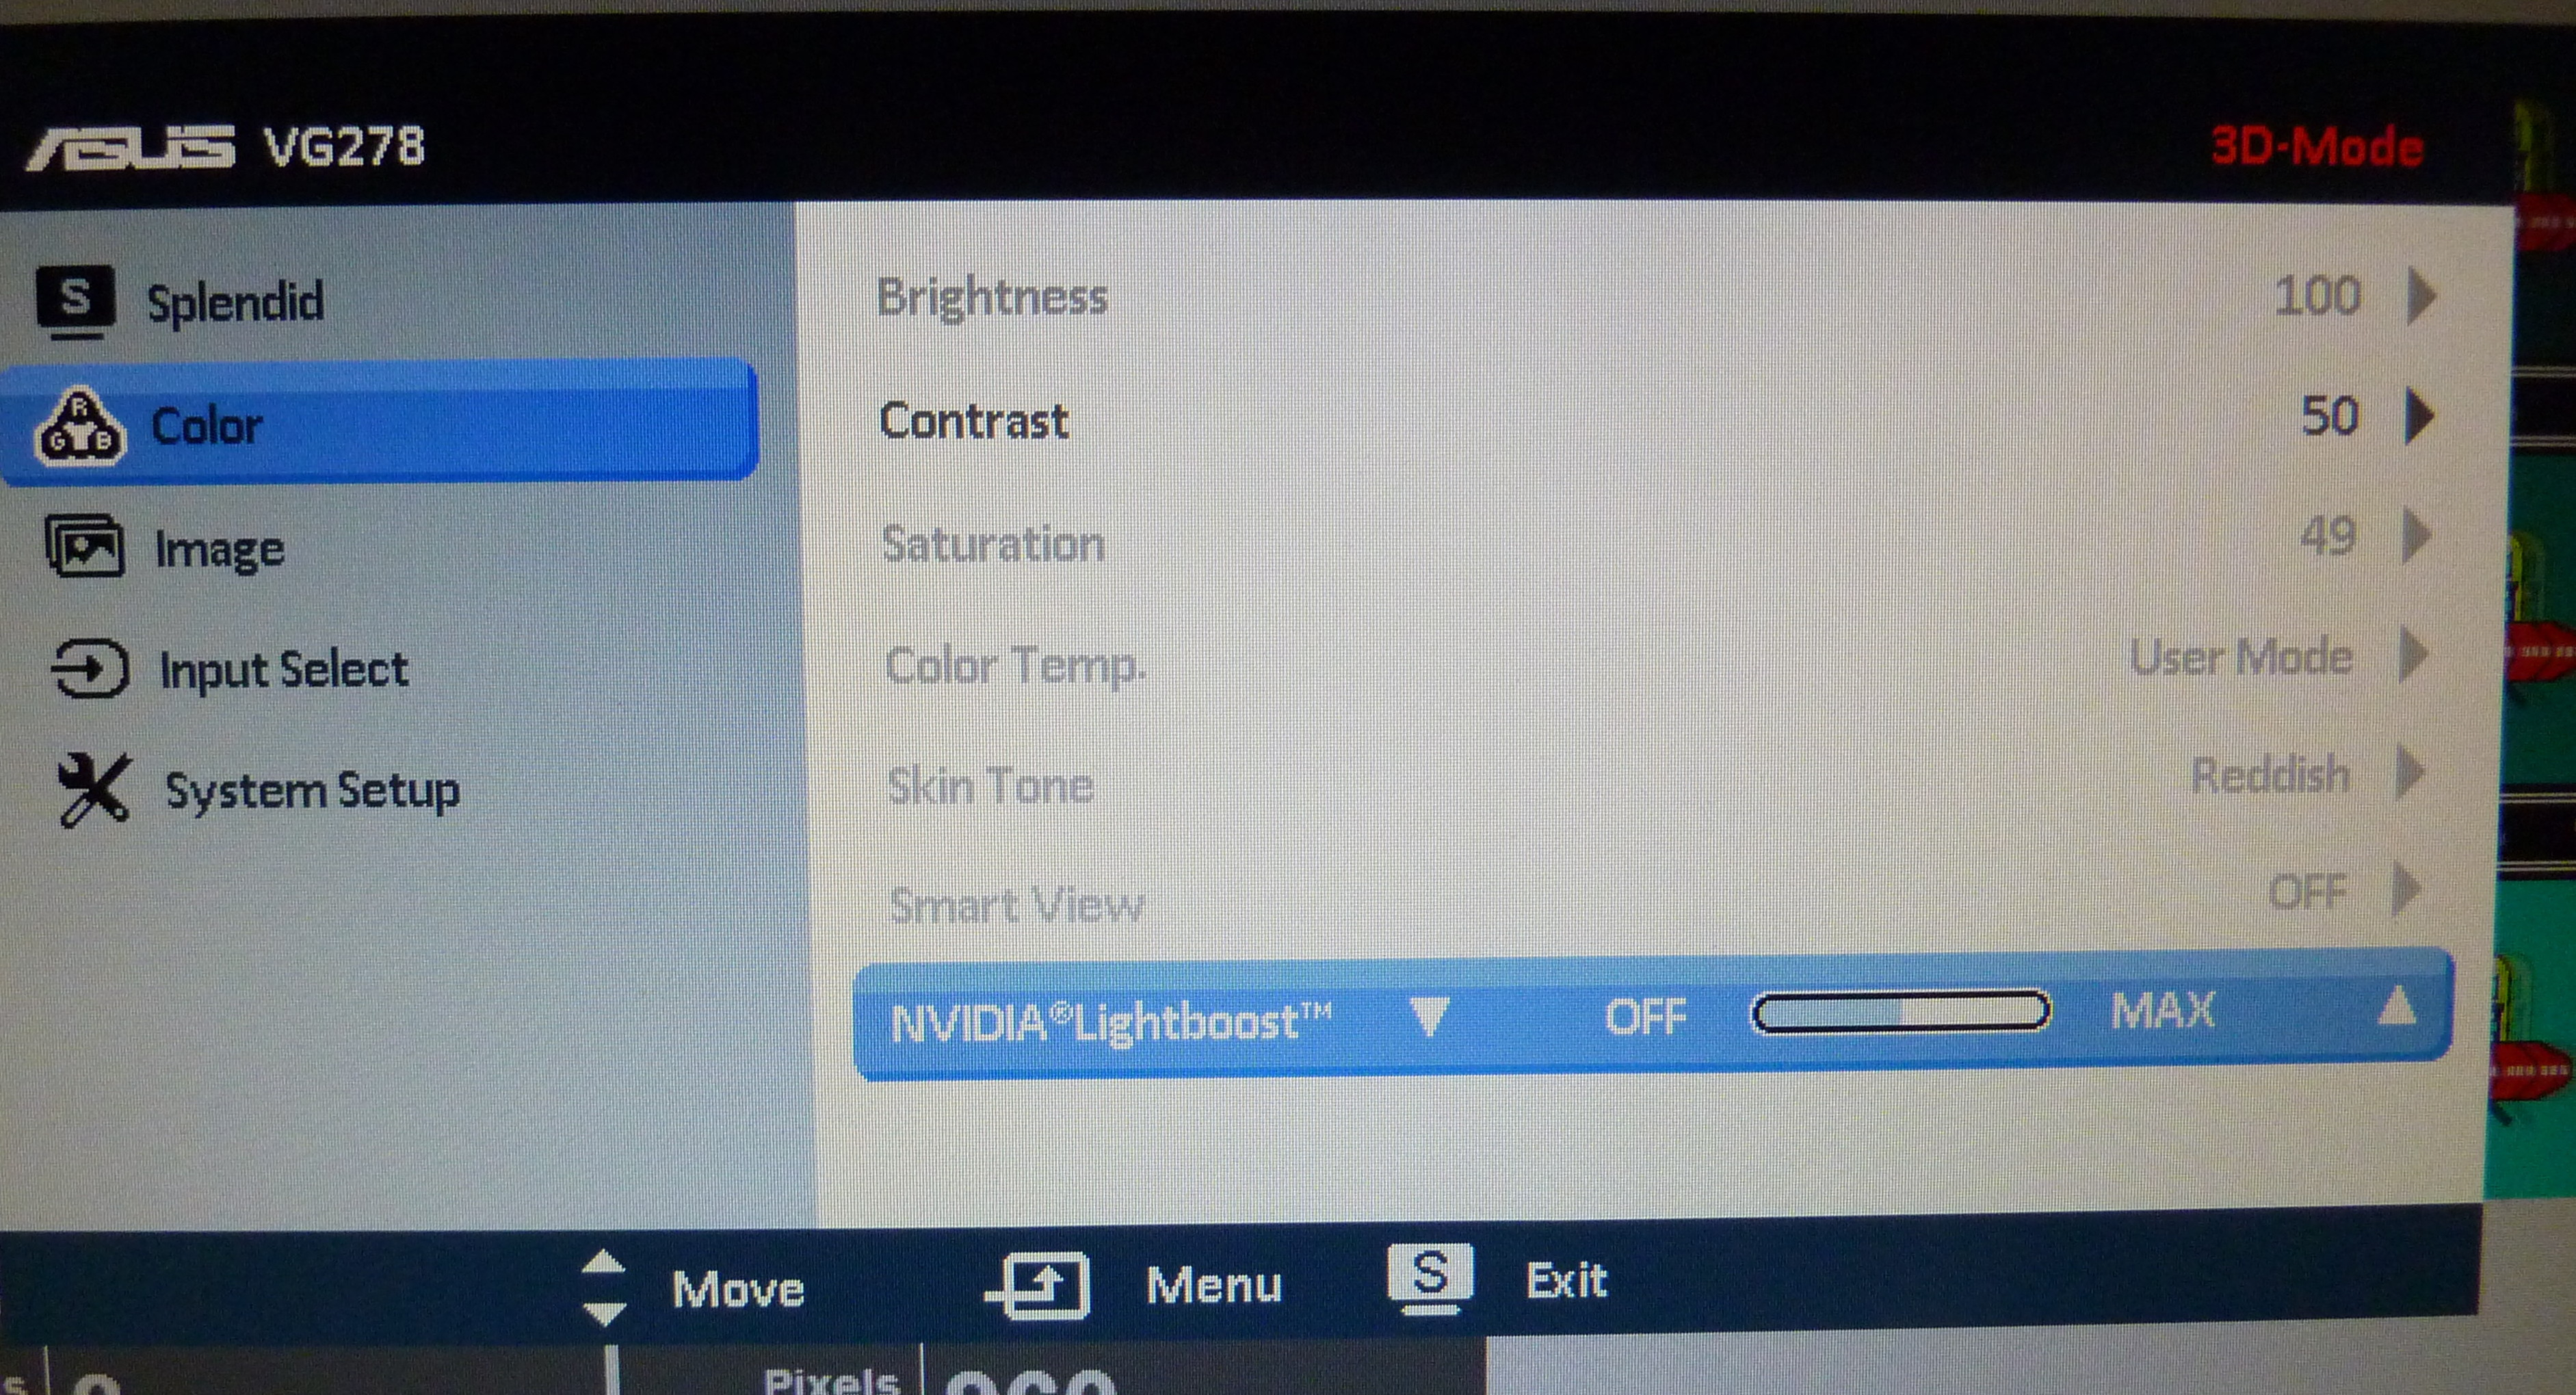
Open your monitor’s on-screen menus (OSD), and look for the LightBoost setting in the same screen as “Contrast” and “Brightness”. On BENQ monitors, you may need to scroll the menu downwards to reveal this setting. On ASUS monitors, the front-panel brightness button also becomes a quick LightBoost adjustment button.

Q: How do I turn permanently turn off LightBoost?
To turn off LightBoost:
1. Disable the “3D Stereoscopic” checkbox in Control Panel.
2. Unplug the monitor’s power supply for 5 seconds, and then plug in again.
(this clears the nVidia LightBoost unlock.)Q: How do I turn quickly turn on/off LightBoost?
1. The easiest way to turn on/off LightBoost is via the ToastyX Strobelight Utility.
You can easily turn on/off LightBoost via Control+Alt+Plus and Control+Alt+Minus.
IMPORTANT: Make sure you install multiple refresh rates during strobelight-setup.exe so you can turn off LightBoost.2. If you enabled LightBoost via vendor supported method (the one that requires Control+T), then simply disable the “3D Stereoscopic” checkbox in nVidia Control Panel.
3. If you enabled LightBoost via an older hack method (or ToastyX method), the easiest way to temporarily turn off LightBoost is to simply switch refresh rates. Use the ToastyX Custom Resolution Utility to add non-LightBoost refresh rates (use “Reduced” instead of “Auto” under Timing, to create non-LightBoost refresh rates). For example, switching between 119Hz/120Hz, or switching betwen 120Hz/144Hz, can be the method of turning ON/OFF LightBoost. You can also use Entech Taiwan’s multires.exe to switch refresh rates quickly.
Q: I have 3D Vision glasses. Sometimes I want 2D, sometimes I want 3D. How?
You can use Control+T to disable stereoscopic mode in games. Alternatively, you can also download 3D Vision Toggler to easily turn ON/OFF the stereoscopic mode. You can keep LightBoost enabled in 2D mode, by using ToastyX Strobelight.
Q: Should I use VSYNC ON or VSYNC OFF?
VSYNC OFF will produce less input lag, for a better competitive advantage during online game play. There may be more tearing artifacts, however.
VSYNC ON can produce a much smoother LightBoost effect (if you can get a frame rate matching refresh rate, such as 120fps @ 120Hz). This can be preferable during solo gaming, when a competitive advantage is not required.Q: What are the pros/cons of LightBoost?
The major advantage of LightBoost is the complete elimination of motion blur, when you are able to run at 120 frames per second.
 vs
vs 
Main Pros:
+ Elimination of motion blur. CRT perfect clarity motion.
+ Improved competitive advantage by faster human reaction times.
+ Far more fluid than regular 120Hz or 144Hz.
+ Fast motion is more immersive.Main Cons:
– Reduced brightness.
– Degradation of color quality.
– Flicker, if you are flicker sensitive.
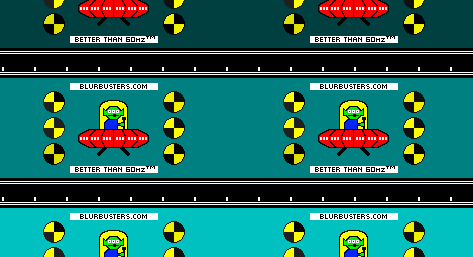
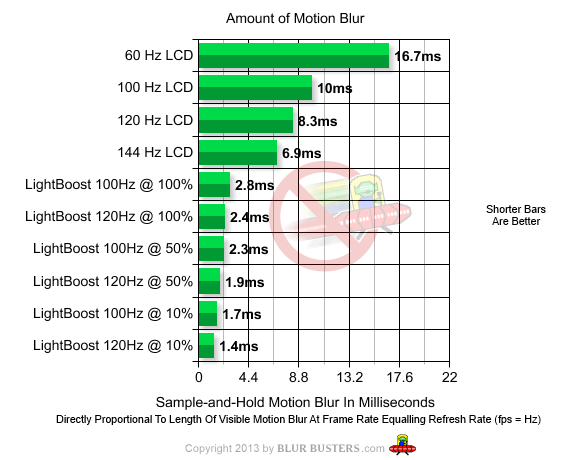
– Requires a powerful GPU to get full benefits.This chart compares the motion blur differences:

Q: What is the advantage of LightBoost 10%?
This produces the clearest possible LightBoost motion, for the best “CRT quality” motion. However, this image may be too dark if you prefer a brighter image.
Q: What is the difference between LightBoost 10%, 50% and 100%?
Lower LightBoost settings (via the monitor’s menus) has slightly clearer motion, but also a dimmer image. Adjust this to your preference; if you prefer a brighter LightBoost picture.
Q: What, exactly, is LightBoost?
 LightBoost is a strobe backlight invented by nVidia for 3D Vision to serve three purposes simultaneously:
- Reduce 3D crosstalk.
- Make image brighter with 3D glasses.
- Eliminate motion blur.
(good for 2D too, without 3D glasses)
The third item is the most important feature, from the Blur Busters perspective.
This is the raison d’être of LightBoost HOWTO, which specifically enables the LightBoost motion blur elimination feature for 2D gaming (without needing 3D glasses).LightBoost is currently more popular for 2D motion blur elimination, than for 3D Vision.
See LightBoost media coverage (including ASUS, NewEgg, Ars Technica!), as well as rave review testimonials. Another good article is TFTCentral: Motion Blur Reduction Backlights.Q: Which is better? LightBoost or G-SYNC?
It depends on the game or framerate. As a general rule of thumb:
LightBoost: Better for games that sustain a perfect 120fps @ 120Hz
G-SYNC: Better for games that have lower/fluctuating variable framerates.This is because G-SYNC eliminates stutters, while LightBoost eliminates motion blur. LightBoost can make stutters easier to see, because there is no motion blur to hide stutters. However, LightBoost looks better when you’re able to do perfect full framerates without variable frame rates.
G-SYNC monitors allows you to choose between G-SYNC and backlight strobing. Currently, it is not possible to do both at the same time, though it is technically feasible in the future.
Q: Which monitors supports LightBoost?
Supported monitors include ASUS: VG248QE, ASUS VG278H, ASUS VG278HE, BENQ XL2411T, BENQ XL2420T, BENQ XL2420TX, BENQ XL2420TE, BENQ XL2720T, Acer HN274HBbmiiid.
For Samsung, some Samsung 120Hz monitors have a strobe backlight similiar to LightBoost. See the Samsung HOWTO for more info.
For laptops, the Toshiba Qosimo X875 supports LightBoost.


Picture
Q: I thought “LightBoost” boosts picture brightness? Why is it not bright?
LightBoost is a strobe backlight which mainly brightens the picture during 3D glasses use:
Why LightBoost Is Brighter For 3D Vision (Using 3D Glasses)
LightBoost is brighter for 3D Vision because LCD shutter glasses can be open longer. See this explanation of why LCD shutter glasses can be open longer because of LightBoost. This allows the picture to be brighter for 3D Vision, as the strobe backlight is synchronized to the shutters of the 3D glasses. In this case, LightBoost lives up to its name — it boosts the amount of light during 3D glasses use.Why LightBoost Is Not Necessarily Brighter For 2D
This doesn’t apply when you’re not wearing 3D glasses. The backlight is being turned off between refreshes. The black periods between refreshes means the picture is dimmer (on average) for 2D without the glasses. (Again, if you’re comparing maximum LightBoost setting to maximum non-LightBoost brightness setting, for an apples-versus-apples comparison). During regular 2D use, LightBoost is essentially equivalent to PWM dimming (Pulse-Width Modulation), and the 2D LightBoost picture is darker than non-LightBoost Brightness 100%. Also, LightBoost 100Hz is often brighter than LightBoost 120Hz.Q: My color is too purple!
1. First, lower your monitor’s Contrast until the purple disappears.
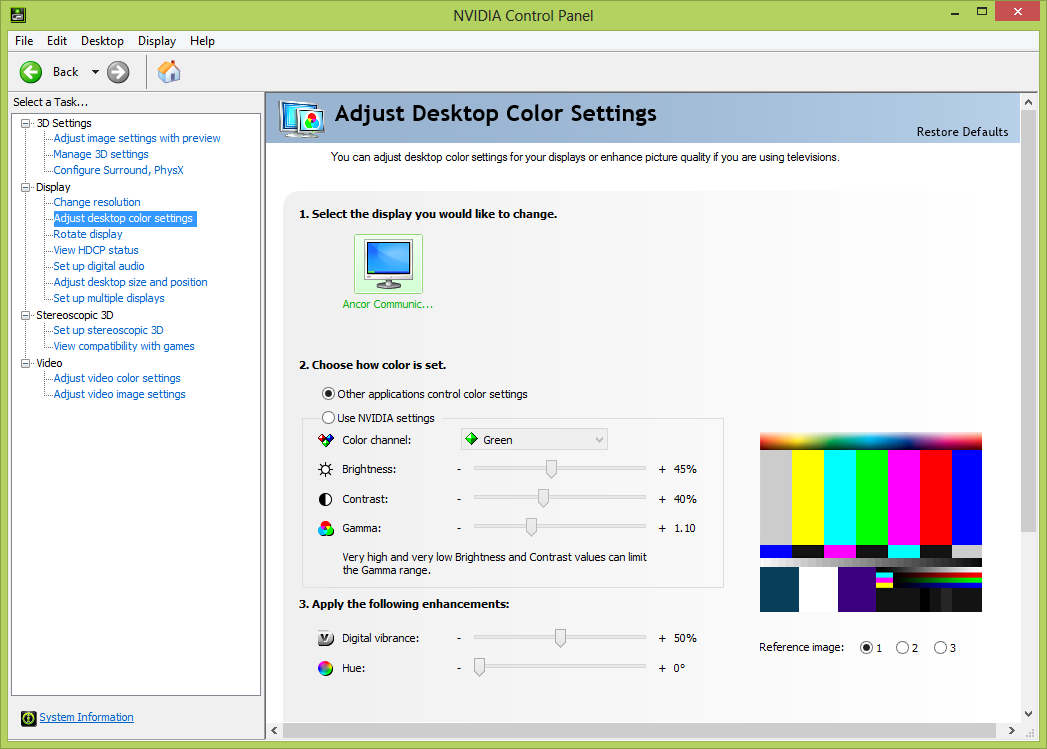
e.g. BENQ XL2411T and ASUS VG248QE looks less purple at a Contrast of “45”.2. Use These nVidia Control Panel Settings
nVidia Control Panel Desktop Brightness = 52%
nVidia Control Panel Desktop Contrast = 45%
nVidia Control Panel Desktop Gamma = 0.70Some other people have also posted color adjustments as well. Google “LightBoost crimson fix” for some starter settings, to begin adjusting from, via nVidia Control Panel. You can also adjust color automatically and more precisely by using a colorimeter such as Spyder4 Pro or i1 Display Pro. See Advanced Picture Improvement for more information.
Installing your monitor’s drivers can improve your monitor’s color as well.
There is a calibration file available (icm) for the ASUS VG248QE.This defective color is probably a vendor calibration to compensate for the greenish-colored 3D Vision glasses. However, this interferes with 2D LightBoost color quality.
Q: My colors are washed out!
You can adjust colors via nVidia Control Panel, while viewing the Lagom LCD Patterns.
For a quick fix to make colors more saturated, and undo the LightBoost gamma bleaching effect, adjust nVidia Control Panel settings to:nVidia Control Panel Desktop Brightness = 52%
nVidia Control Panel Desktop Contrast = 45%
nVidia Control Panel Desktop Gamma = 0.70
You can also adjust color automatically and more precisely by using a colorimeter such as Spyder4 Pro or i1 Display Pro. For more information, see Advanced Picture Improvement.
Q: My monitor adjustments are locked! How do I adjust color?
During LightBoost mode, the LCD panel is pushed to its limits. Adjustments can cause increased crosstalk (3D Vision). nVidia and the monitor manufacturers decided to restrict picture adjustments via the monitor for this reason. This does make it more difficult to adjust the picture.
You can still manually adjust colors via nVidia Control Panel:
These are common nVidia Control panel settings to fix the LightBoost washed out colors:
nVidia Control Panel Desktop Brightness = 52%
nVidia Control Panel Desktop Contrast = 45%
nVidia Control Panel Desktop Gamma = 0.70You can also adjust color automatically and more precisely by using a colorimeter such as Spyder4 Pro or i1 Display Pro. For more information, see Advanced Picture Improvement.
Q: My picture is too dark!
Raise the “LightBoost” setting via the monitor’s menus.
For ASUS, if still to dark, raise the “Contrast” setting above 65%, but no higher than 90%. For some BENQ models, the white clipping point occurs at 50%.
NOTE: Raising the “Contrast” may cause washed-out colors and clipped whites, unless you re-calibrate. See the Advanced Picture Improvement section for more information.If LightBoost is still too dark after adjustment, try using 100Hz LightBoost instead of 120Hz LightBoost. It has been reported that 100Hz LightBoost produces a brighter image.
Q: My picture is too bright!
Lower the “LightBoost” setting via the monitor’s menus. (but not all the way to “OFF”)
Q: The 144Hz setting is missing! How to fix?
You can use the ToastyX Custom Resolution Utility to add 144Hz back.
When adding 144Hz, select “Reduced” instead of “Auto” under Timing.If you used ToastyX Strobelight, re-run strobelight-setup.exe and make sure to also install the 144 Hz refresh rate.
Fluidity
Q: Does LightBoost make stutters and tearing more visible at low framerates?
Yes, LightBoost motion can make stutters and tearing easier to see, especially at lower framerates. (Regular LCD motion blur actually helps to hide small stutters and tearing).
Using a higher frame rate will compensate for this. Getting LightBoost benefits requires a much higher frame rate than normal (e.g. 120fps @ 120Hz). You may need to adjust your game detail settings and/or upgrade to a more powerful graphics card (e.g. GeForce GTX 680, GTX 770, GTX 780 or Titan).
For solo gameplay where input lag is not critical, you may wish to try playing with VSYNC ON or Adaptive VSYNC. LightBoost particularly benefits motion clarity of motion during framerate=Hz.
Q: How can I make LightBoost smoother with VSYNC OFF?
If you have a sufficiently powerful GPU, it is best to run at a frame rate massively exceeding your refresh rate. This can reduce the tearing effect significantly. Recommended GPU’s include GeForce GTX 680, GTX 770, GTX 780 or Titan, preferably in SLI if you want to run newer games.
Otherwise, there may be more visible tearing if you run at a frame rate too close to your refresh rate, during VSYNC OFF operation. Also, there can also be harmonic effects (beat-frequency stutters) between frame rate and refresh rate. For example, 119fps @ 120Hz can cause 1 stutter per second.
Therefore, during VSYNC OFF, it is usually best to let the frame rate run far in excess of the refresh rate. This can produce smoother motion (fewer harmonic stutter effects) and less visible tearing. Alternatively, use Adaptive VSYNC as a compromise.
Q: How can I reduce input lag with LightBoost?
Use the ToastyX LightBoost Method. Disable the 3D Stereoscopic checkbox in Control Panel. This reduces input lag by disabling all 3D Vision overhead on the computer side, while keeping LightBoost enabled within the monitor.
Q: I can only do 80 fps! Will LightBoost still benefit me?
Once you run at frame rates above above half the refresh rate, you will begin to get noticeable benefits from LightBoost. However, LightBoost benefits only become major when frame rates run near the refresh rate (or exceeding it).
Many LightBoost monitors are already excellent 120Hz and 144Hz gaming monitors (including ASUS VG248QE, ASUS VG278H, BENQ XL2720T, etc.) You can turn on/off LightBoost, depending on games and future GPU upgrades (e.g. GeForce GTX 680, GTX 770, GTX 780 or Titan).
Q: My games are capped at 60fps! How to fix?
Some video games have a frame rate cap.
Search for instructions on removing the frame rate cap from your specific game, such as:
Google “Skyrim 60fps cap”
Google “remove fps cap from Skyrim”Source-engine video games (e.g. Counterstrike, Team Fortress 2, etc) have an “fps_max” setting that is accessible at the console or via editing a text-based configuration file.
Q: What GPU do I need for LightBoost?
LightBoost is an nVidia technology, so nVidia GPU’s are recommended.
For complete elimination of motion blur, it is necessary to have frame rates as close to the refresh rate as possible. LightBoost only works at 100Hz through 120Hz. Therefore, you want triple-digit frame rates whenever possible. This requires a powerful GPU such as GeForce GTX 680, GTX 770, GTX 780 or Titan, possibly in SLI for newer games.
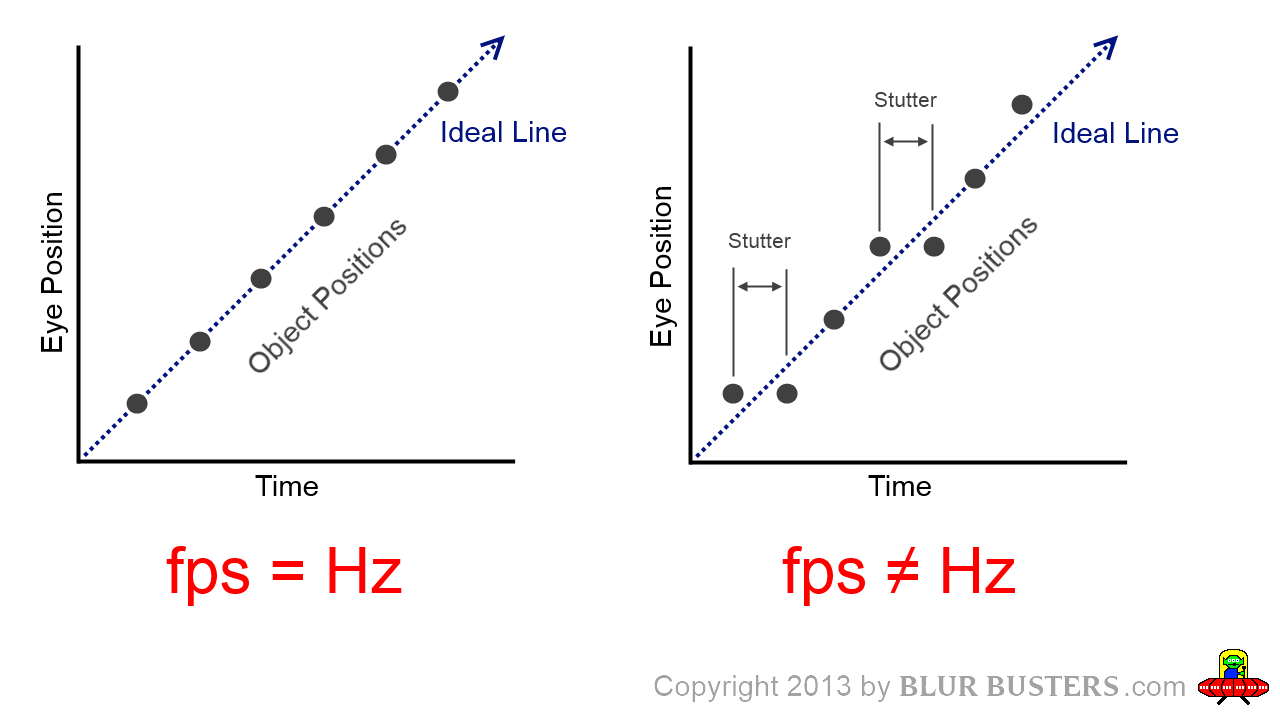
Q: Why does LightBoost look better with VSYNC ON?
The most perfectly smooth motion (zero motion blur) occurs when the frame rate exactly matches refresh rate, which occurs most easily with VSYNC ON:

For a better understanding of this graph, read about sample-and-hold effect in this article: Why Do Some OLED’s Have Motion Blur? Also see Science & References for more info.
VSYNC ON can add input lag during competitive gaming, so it is usually more desirable for less critical gameplay, such as solo gaming. Adaptive VSYNC can be a good compromise.
Vision
Q: Can I get used to LightBoost?
Most people have no problems with a 120Hz flicker (like a 120Hz CRT) and have no problems with LightBoost flicker.
However, a small segment of the population is flicker sensitive. Read the existing nVidia 3D Vision Safety Information. It is applicable to LightBoost use. LightBoost (for 2D use) is a 120Hz flicker, which is less visible than the 60Hz flicker of active 3D shutter glasses.
If you have not used CRT for a long time, and you wish to get used to a CRT again:
- Play for short time periods at a time.
- Adjust the lighting in your room.
- Put a lamp behind your display.
- Move further back from your monitor.
- Adjust your LightBoost setting. See Picture for more information.
You may find that you eventually get used to the flicker.
Blur Busters Blog disclaims all responsibility for any health or vision problems caused by LightBoost. LightBoost is an nVidia technology, so refer to nVidia 3D Vision Safety Information.Q: LightBoost doesn’t eliminate motion blur for me. Why?
First, verify LightBoost is turned on. The monitor on-screen menus should say “3D MODE” (even for 2D), and “LightBoost” setting should be unlocked in the monitor menus.
If LightBoost is already enabled, see below:Pre-requisites
- Frame rate matches or exceeds refresh rate (e.g. 120fps @ 120Hz).
LightBoost motion blur elimination is not noticeable at 60 frames per second. - You are using a sufficiently powerful GPU, preferably GeForce 680, 770, 780 or Titan.
- You are tracking your eyes on fast-moving objects (e.g. fast-panning screen)
- Turn off your game’s motion blur effect. Many games add motion blur as a GPU effect.
Troubleshooting
- Try a motion test such as PixPerAn, to verify motion.
- Try perfect motion fluidity (fps matching Hz) by testing VSYNC ON temporarily.
- Try eliminating the computer mouse as a stutter factor. Temporarily test using keyboard. Mouse stutters can motion blur.
- Do the game fluidity test below:
Game Test With Perfect Motion Fluidity
(A) Load an older FPS game that can consistently run at over 120 frames per second.
(e.g. Half Life 2, Counter Strike, Team Fortress 2, Quake Live, Borderlands);
(B) Temporarily turn VSYNC ON; This is important during this temporary test;
(C) Ensure the frame rate is matching refresh rate (e.g. 120fps @ 120Hz);
(D) Strafe fast in front of a high-resolution wall via the keyboard (left/right arrow keys);
(E) Track your eyes on objects on the wall (e.g. poster) while you’re strafing left/right. Repeat the test with LightBoost enabled and disabled. There will be far less motion blur with LightBoost enabled. Small text on walls will be more readable while strafing.Human Factors
- Your ability to track fast-moving objects; and your sensitivity to motion blur.
- Whether or not you are used to CRT gaming. (LightBoost brings the CRT effect to LCD)
- Some people growing up today, has never played on a CRT before. Such individuals may be less likely to notice quickly.
- Some people only have a habit of eye-tracking only slower-moving objects.
- Specific play styles. Strafing sideways & turning motions benefits more than walking forward.
- Sensitivity to input lag, flicker, etc. (You benefit more if you don’t feel any effects from input lag or flicker)
- Some people have vision limitations that prevent seeing motion blur elimination on strobe displays (CRT, LightBoost)
Computer Factors That Hurt LightBoost
- Inability to run frame rate equalling Hz for best LightBoost benefit. (e.g. 120fps@120Hz).
- Judder/stutter control. Too much judder can kill LightBoost motion clarity benefits.
- Framerate limits. Some games cap to 60fps, this needs to be uncapped (e.g. fps_max)
- Faster motion benefits more. Not as noticeable during slow motion.
- Specific games. e.g. Team Fortress 2 benefits far more than World of Warcraft.
- Some games stutters more with VSYNC ON, while others stutters more with VSYNC OFF. Test opposite setting.
- High quality mouse (e.g. 1000 Hz gaming mouse). Ordinary mice adds too much judder, eliminating LightBoost benefit.
Example of Game Play Benefitting From Elimination of Motion Blur:
- Fast 180-degree flick turns in FPS shooting;
- Shooting while turning, without stopping turning (easier on CRT or LightBoost);
- Close-up strafing, especially circle strafing;
- Running while looking at the ground (e.g. hunting for tiny objects quickly);
- Identifying multiple far-away enemies or small targets, while turning fast;
- Playing fast characters such as “Scout” in Team Fortress 2;
- High-speed low passes, such as low helicoptor flybys in Battlefield 3, you aim better.
For people who have gameplay styles in fast-action video games, such people can gain a massive competitive advantage (see improved Battlefield 3 stats) during fast-motion activities, because it is possible to react faster. Without motion blur, enemies are easier to identify while you’re still in fast motion. Even out of the corner of your eyes, even before you stop moving. Without motion blur, fast panning motion look as perfectly sharp as being stationary.
- Frame rate matches or exceeds refresh rate (e.g. 120fps @ 120Hz).
Q: Why does LightBoost have LESS eyestrain?
This can be because of lack of motion blur, lack of LCD artifacts, and/or dimmer image.
- Lack of motion blur: LightBoost eliminates motion blur. Some people get eyestrain from motion blur.
- Lack of motion artifacts: Nearly all common LCD motion artifacts are gone. There is no multiple-edged motion artifacts caused by generic PWM dimming.
- Brightness: LightBoost can be adjusted to a very dim setting, which can help people who get eyestrain from an excessively bright monitor. See Picture for more information.
NOTE: LightBoost is not for people who are very flicker-sensitive. See nVidia 3D Vision Safety Information. If you hated CRT, even at 120Hz, then turn off LightBoost.
Q: Why does LightBoost have MORE eyestrain?
This can be because of flicker or brightness.
- Flicker: Some people are sensitive to flicker: You may be getting flicker eyestrain.
LightBoost is a strobe backlight. It flickers like a 120Hz CRT. - Brightness: If your eyestrain is due to excessive brightness, adjust the LightBoost setting. See Picture for more information.
Common sense rules here. See nVidia 3D Vision Safety Information, which is applicable to LightBoost. LightBoost (for 2D use) is a 120Hz flicker, which is less visible than the 60Hz flicker of 3D shutter glasses.
- Flicker: Some people are sensitive to flicker: You may be getting flicker eyestrain.
Technical
Q: Does LightBoost shorten the life of the monitor’s backlight?
No. LightBoost is a built-in function of a monitor. It is a part of nVidia 3D Vision.
LED’s do not undergo meaningful wear and tear by being turned on/off, when done within the LED’s power specifications. LightBoost is simply a low-frequency motion-optimized PWM (pulse-width modulation), and is dimmer than non-LightBoost 100% Brightness. LED stand for Light Emitting Diode, which are semiconductor devices. They are also used for fiber optic cables that do not use lasers, such as TosLink (LED’s that switch on/off millions of times per second!).
Q: How does LightBoost eliminate motion blur?
LightBoost is a strobe backlight that eliminates the LCD sample-and-hold effect.
It uses flicker (like a CRT) to eliminate motion blur. See this high speed video:The backlight is turned off while waiting for pixel transitions (unseen by human eyes), and the backlight is strobed only on fully-refreshed LCD frames (seen by human eyes). The strobes can be shorter than pixel transitions, breaking the pixel transition speed barrier! It also eliminates the sample-and-hold effect.
Q: How is LightBoost different from PWM?
PWM (pulse-width modulation) is a high-frequency flicker that is used for dimming the backlight. If you use a monitor Brightness setting of less than 100%, your monitor may use PWM flicker to dim the backlight.
This can create certain kinds of motion artifacts, even if you’re not flicker sensitive. (Some people actually get eyestrain from PWM artifacts, instead of PWM flicker). LightBoost is like a low-frequency PWM, that flashes once per refresh, in a way more optimized to motion blur elimination.
LightBoost strobes only once per refresh, producing clean motion:
PWM strobes multiple times per refresh, producing multiple-edge artifacts:

Q: Why do I need 120fps @ 120Hz for LightBoost?
LightBoost is a strobe backlight limited to 100Hz through 120Hz. It is like having a CRT monitor that runs only between 100Hz and 120Hz. When running a refresh rate outside this range, the monitor behaves as an ordinary LCD with lots motion blur, since the backlight no longer strobes in sync with the refresh rate.
LightBoost reduces so much motion blur, that it becomes much easier to see stutters at a higher framerate than usual. (Motion blur on normal LCD’s, can hide stutters). Stutters only completely disappear if you run at a frame rate perfectly matching refresh rate LightBoost is not usually worthwhile if you can only run at 60fps @ 120Hz. You need a frame rate more than half refresh rate, to begin getting real LightBoost benefits. The benefits keep increasing significantly the closer the frame rate becomes to refresh rate. Ths most perfect LightBoost motion (zero motion blur) occurs at a frame rate exactly matching refresh rate.
It is also possible to run LightBoost at 100Hz. In this case, 100fps @ 100Hz produces great results. Doing 100fps@100Hz can produce more fluid motion than 100fps@120Hz.
Getting triple-digit frame rates in many video games, require a powerful GPU such as GeForce GTX 680, GTX 770, GTX 780 or Titan. To run at high detail levels in newer games (e.g. Crysis 3), you may need to run multiple GeForce cards in parallel (SLI).
Q: Why does it look good at fps=Hz? (frame rate matching refresh rate)
Your eyes are continuously moving while tracking a moving object on a screen.
The smoothest motion occurs when the frame rate exactly matches refresh rate:A mismatch between frame rate and refresh rate, causes stutters. In addition, repeated refreshes can also contribute to a sample-and-hold effect. For more information about the sample-and-hold effect, see article: Why Do Some OLED’s Have Motion Blur?
Q: Why doesn’t LightBoost work at 144Hz?
LightBoost requires enough bandwidth in the monitor for a longer pause between refreshes (long vertical blanking interval). This gives enough time between refreshes to strobe the backlight.
144Hz only works with a reduced amount of time between refreshes, so there is not enough time to strobe the backlight between refreshes. (For example, 144Hz only works if you use “Reduced” timings via ToastyX Custom Resolution Utility).
Q: Why is 120Hz LightBoost better than 144Hz non-LightBoost?
144Hz non-LightBoost continuously shines each refresh for a full 1/144second (6.9ms).
120Hz LightBoost briefly flashes the backlight for 2.4ms (or less).
Motion blur is dictated by the length of time a refresh is visible to the human eye:In fact, 100Hz LightBoost has less motion blur than 144Hz non-LightBoost.
This is also the same reason why CRT 60fps @ 60Hz has traditionally had less motion blur than regular LCD 120fps @ 120Hz.
Q: Why is LightBoost so difficult to enable? nVidia vendor lock-in?
LightBoost was designed by nVidia, originally for 3D Vision. It is easy to enable if you have a 3D Vision Kit. However, it is difficult to enable if you do not have a 3D Vision Kit.
LightBoost certainly benefits 2D gaming for motion blur elimination (without 3D glasses).
Hacks were found during early 2013 (LightBoost HOWTO) to allow enabling of LightBoost, without needing to purchase a 3D Vision kit.LightBoost is actually a two-step process:
(1) nVidia vendor unlock. (one-time process, unless unplugged from power)
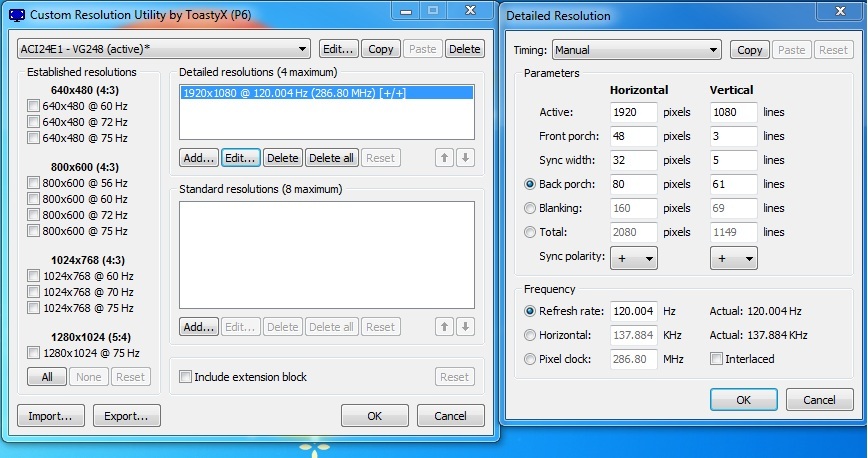
(2) Custom Resolution.LightBoost monitors need a special nVidia signal from the computer, before allowing LightBoost to be enabled. This prevents nVidia’s competitors, such as AMD, from taking advantage of LightBoost. When you run the 3D Vision Setup (which normally only runs if a 3D emitter is connected), the software sends a LightBoost unlocking signal to the computer monitor. When this is done, LightBoost is unlocked (at least until the monitor is unplugged from power). It is very easily enabled via a custom resolution (e.g. 1920×1080 with a Vertical Total of 1149).

One of the easiest way to enable LightBoost is the new ToastyX method.


Advanced Picture
Q: Can Spyder4 or i1 Display Pro improve LightBoost color?
Yes! Using a colorimeter such as Spyder4 Pro or i1 Display Pro greatly benefits your monitor’s picture! You put this sensor on your screen, and click a button to automatically adjust. It is much easier to get a good picture.
Q: How do I calibrate my picture?
MANUALLY: You can manually adjust colors via nVidia Control Panel, while viewing the Lagom LCD Patterns. You may also use Windows 8 Display Color Calibration.
AUTOMATIC: You can also adjust color automatically and more precisely by using a colorimeter such as Spyder4 Pro or i1 Display Pro. You put this sensor on your screen, and click a button to automatically adjust. It is much easier to get a good picture.
Q: How do I make Borderlands 2 more colorful looking?
- Adjust “Contrast” via monitor menus to eliminate any color tint (e.g. purple tint).
- Adjust Borderlands in-game Brightness setting to “5”
- Adjust “LightBoost” setting via monitor menus to preference (e.g. LightBoost 50%)
This greatly reduces the gamma bleaching effect, and colors are less washed out.
Similiar picture adjustments apply in other video games.Q: How to calibrate for better color and maximum contrast?
This is easiest with a colorimeter such as Spyder4 Pro or i1 Display Pro.
For a quick manual adjustment, adjust your nVidia Control Panel Gamma to these settings:
nVidia Control Panel Desktop Brightness = 52%
nVidia Control Panel Desktop Contrast = 45%
nVidia Control Panel Desktop Gamma = 0.70
This fixes the LightBoost gamma bleaching (washed out colors).- While viewing Lagom Contrast, adjust your monitor’s “Contrast” setting as high as possible without clipping the bright colors. On ASUS VG278H, this happens at a contrast setting of 90%. Your colors will be very washed out (gamma bleaching effect).
- Next, use your colorimeter (Spyder4 Pro or i1 Display Pro) to recalibrate the monitor to the new color gamut. This will make things more colorful, while keeping the contrast (fixes the gamma bleaching effect). You might get increased motion artifacts on some displays (and more 3D crosstalk).
The best contrast ratio for LightBoost is currently occuring (as of June 2013) with the BENQ XL2720T monitor, achieving nearly 1000:1 contrast ratio in LightBoost.
(Most LightBoost monitors barely get over 500:1 during LightBoost-enabled mode.)
Q: How to calibrate for minimum motion artifacts?
Reduce your monitor’s Contrast ratio to 65 to 75% (for ASUS) or to 35 to 50% (for BENQ), well below the white clipping point. Then, if possible, use your colorimeter (Spyder4 Pro or i1 Display Pro) to recalibrate the monitor to this new color gamut.
This will reduce LightBoost motion artifacts (e.g. trailing “sharp ghost” artifact, double-image artifacts, and checkerboard pixel pattern artifacts). You will have a lower contrast ratio, and may also have a slightly less colorful image.
Q: My games doesn’t use my desktop calibration! How to fix?
Q: My LightBoost monitor has poor color. Any better LightBoost monitors?
Yes. Some models of LightBoost monitors is known to have poorer colors than others.
For a quick manual adjustment, adjust your nVidia Control Panel Gamma to these settings:
nVidia Control Panel Desktop Brightness = 52%
nVidia Control Panel Desktop Contrast = 45%
nVidia Control Panel Desktop Gamma = 0.70
This compensates for the LightBoost gamma bump (washed out colors).As of June 2013, in general experience, the ASUS VG278H and the BENQ XL2720T has better LightBoost color (with latest nVidia drivers) and average trailing artifacts. The BENQ XL2420T also has better colors (but worse trailing artifacts than VG248QE and XL2411T) as are the Samsung 120Hz monitors (but worse input lag than LightBoost).
Further Reading
For instructions for ASUS/BENQ 120Hz, see LightBoost HOWTO.
For instructions for Samsung 700D/750D/950D, see Samsung HOWTO.